Tuesday, May 29, 2012

Java Persistence API (JPA) in Web JSF Application Using MySQL

The Java Persistence API ( JPA ) is Java Specification for persisting the Java Objects to relational database using popular ORM technology. JPA provides enough tools to enable the java developers to create database driven applications quickly. The API can be used to persist the business object to the relational database. Retrieving the data from database in the form of business objects is so simple with the help of JPA API.


Contents:
  1. Creating a Database Using MySQL
  2. Making a Connection to the Database Using NetBeans
  3. Creating the Maven Projects
  4. Creating a Java Persistence Entity Class Representing the Student Table
  5. Creating a Persistence Unit
  6. Creating the Classes
  7. Creating the Entity Controller Class
  8. Binding the Managed Bean
  9. Doing Some Customization

Creating a Database Using MySQL

Firstly , Create a database named studentdb. Execute the following SQL statement on MySQL Command Line Client. 
create database studentdb;

Then verify using show databases; statement


Making a Connection to the Database Using NetBeans

In, NetBeans, connect to the studentdb database by following the steps shown in the following Figures.
Click the Services tab, the right click on the Databases then Choose the New Connection.


There are lot of Databases Drivers. We choose MySQL(Connector/J driver), then Click Next button.


Fill in the MySQL connection string Database name, user name, and its password and Click Next. In this case we are using root user.


Creating the Maven Projects

Create a maven web application using command line. (This task already mentioned in previous Post in this blog)


The open the created project in NetBeans and then add necessary dependencies for this project. following dependencies are added to pom.xml for my project.
<!-- junit for unit testing -->
        <dependency>
            <groupId>junit</groupId>
            <artifactId>junit</artifactId>
            <version>3.8.1</version>
            <scope>test</scope>
        </dependency>
        
<!-- jsf dependencies -->
        <dependency>
            <groupId>com.sun.faces</groupId>
            <artifactId>jsf-api</artifactId>
            <version>2.0.0-b13</version>
            <scope>compile</scope>
        </dependency>
        <dependency>
            <groupId>com.sun.faces</groupId>
            <artifactId>jsf-impl</artifactId>
            <version>2.0.0-b13</version>
            <scope>compile</scope>
        </dependency>


<!-- primefaces dependency for user user inetrfaces-->
        <dependency>
            <groupId>org.primefaces</groupId>
            <artifactId>primefaces</artifactId>
            <version>3.2</version>
        </dependency>
    
        <!-- Log4j dependency for logging-->
        <dependency>
            <groupId>log4j</groupId>
            <artifactId>log4j</artifactId>
            <version>1.2.16</version>
        </dependency>        
       
        <!-- Hibernate framework -->        
        <dependency>
            <groupId>org.hibernate</groupId>
            <artifactId>hibernate-entitymanager</artifactId>
            <version>3.6.5.Final</version>
        </dependency>


 <!-- MySQL Connector with java  -->   
        <dependency>
            <groupId>mysql</groupId>
            <artifactId>mysql-connector-java</artifactId>
            <version>5.1.13</version>
            <type>jar</type>
        </dependency>


 <!-- Java EE web application  -->
    <dependency>
      <groupId>javax</groupId>
      <artifactId>javaee-web-api</artifactId>
      <version>6.0</version>
      <type>jar</type>
    </dependency>
  </dependencies>    


    <repositories>       
        <repository>
            <id>prime-repo</id>
            <name>PrimeFaces Maven Repository</name>
            <url>http://repository.primefaces.org</url>
            <layout>default</layout>
        </repository>   
        <repository>
            <url>http://repo1.maven.org/maven2/</url>
            <id>hibernate-persistence</id>
            <layout>default</layout>
            <name>Repository for library Library[hibernate-persistence]</name>
        </repository>
    </repositories>    
  
 In this project jetty server plugin is added for the web server. following is the jetty plugin.  
     <plugins>
            <plugin>
                <groupId>org.mortbay.jetty</groupId>
                <artifactId>maven-jetty-plugin</artifactId>
                <version>6.1.10</version>                
                </configuration>
            </plugin>
        </plugins>


Then Create a new JSF file and Named as index.xhtml. This is the primary page of this project. And remove the existing index.jsp file.

Creating a Java Persistence Entity Class Representing the Student Table

In this project window, right click the yschool-mini-mayooran project form the contents menu select New---> Entity Class


Following New Entity Class window displays. Put the name for class name Student and put the package name  org.ymini.yschool.mayooran.entitymodel and then click the Next button.


Friday, May 18, 2012

Introduction to Java Server Faces (JSF)

JavaServer Faces (JSF) is a user interface (UI) framework for Java web applications.
It is designed to significantly ease of writing and maintaining applications that run on a Java application server.

JSF provides ease-of-use in the following ways:


  • Makes it easy to construct a UI from a set of reusable UI components
  • Simplifies migration of application data to and from the UI
  • Helps manage UI state across server requests
  • Provides a simple model for wiring client-generated events to server-side application code
  • Allows custom UI components to be easily built and re-used


Thursday, May 3, 2012

Understanding the MVC Architecture

MVC architecture briefly means Model View and Controller architecture.


Model consists of complete business logic of the system.
For example, storing data passed by user in an object, connection and calls to database, storing & retrieving data from database, processing data, performing necessary calculations, preparing results etc.

View is mainly responsible for User Interface part of the system.
For example, creating forms to get data from user, creating forms which displays result to user etc.

Controller provides bridge between Model and View. It controls the whole system flow. When user passes the data to process, controller gets the data from that View and passes to necessary Model for further processing.

figure:1
Once Model is finished processing and calculating operations, it sends the result back to Controller and it again call some View to display result.

In this project, the system is divided in MVC Architecture like this:


Model: JSP Bean class and its functions (Student.java, ClassRoom.java, StudentSearchService.java, MyValidate.java)

View: HTML and JSP pages (index.jsp, success.jsp, failure.jsp)

Controller: Servlet class (MyServlet.java)


Students can be searched by the following parameters Student Name, Grade. User can enter these values and click "Search" button.

I have used ArrayList to store and search the student details. Even though I have tried  to use Hash Map for this purpose but I couldn't finished. then I have tried another way.


If the particular student is registered then system will give that student details. If not system will show the error response. If not system will show the error response.

When you input the wrong details the following error message will be shown.


When you click the search button without student name, Error response will be shown.


If you want to download source code click the following link.

https://github.com/smayoorans/yschool-mini-mayooran

Thanks

Wednesday, April 25, 2012

Building together JAR and WAR in maven

Creating JAR file in maven


To create first project in maven, I used the maven "archetype" mechanism. In maven, archetype is a template of a project.


To create a quick start maven project, execute the following command in Command prompt.
mvn archetype:generate -DgroupId=org.yarlithub.yschool -DartifactId=yschool-mini-mayooapp


Here,
groupId :This is an element that indicates the unique identifier of the Organization that created the project. groudId should follow the package name (reversed DNS of your website)
artifactId :This also is an element that indicates the unique base name of the project.
-D: This command is simply setting Java system properties, this use passing configuration information to Maven.


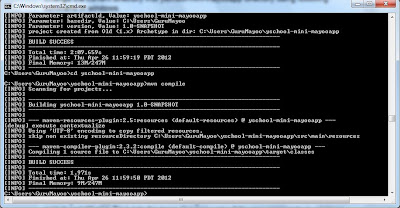
When executed the above command, a directory named "yschool-mini-mayooapp" has been created for this project. After that the project should be compiled.


Change the current directory into yschool-mini-mayooapp directory using following command in windows.
> cd yschool-mini-mayooapp


If you want to add this JAR into another WAR file you can edit this App.java file
For example: If you want to print the current time use the following code. 
public class App{  
   public static String myDate(){
       return new java.util.Date().toString();
    }
}
Then the application sources are compiled using following commands
>yschool-mini-mayooapp>mvn compile
By executing the mvn install command, Maven finishes by installing the JAR file into the local repository, making this JAR file available to other projects.
>yschool-mini-mayooapp>mvn install


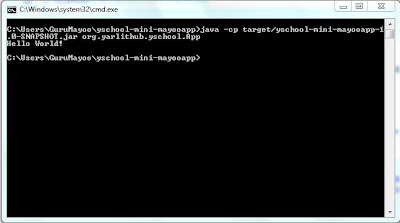
Then to see the out of this project execute the following commands
>yschool-mini-mayooapp>java -cp target/yschool-mini-mayooapp-1.0-SNAPSHOT.jar org.yarlithub.yschool.App


Creating WAR file in maven
Creating a web application in maven is straight forward like above mentioned, but different archetypeArtifactId. Back into the base directory using following commands in windows
>yschool-mini-mayooapp>cd..


After that execute the following command then a web application will be created.
>mvn archetype:generate -DarchetypeArtifactId=maven-archetype-webapp  -DgroupId=org.yarlithub.yschool  -DartifactId=yschool-mini-mayoowebapp


After creating web application, this project must be compiled. Before compilation, If you want add JAR file into WAR file you should add a dependency into the WAR pom.xml


<dependency>
          <groupId> org.yarlithub.yschool</groupId>
          <artifactId> yschool-mini-mayooapp</artifactId>
          <version>1.0-SNAPSHOT</version>  
</dependency>


Then Edit the index.jsp file in web application


<html>
<body>
<h2>Hello Jaffna!</h2>
<h3>Yarl IT Hub<h3>
<p>Is a community who live the shared dream of making Yarl the next Sillicon Valley. We are a not for profit initiative and 100% apolitical. An initiative by the community for the community!</p>
<h3>Now the Time is: <%= org.yarlithub.yschool.App.myDate() %>
</body>
</html>


To compile this project, go to project folder type "yschool-mini-mayoowebapp" using "cd yschool-mini-mayoowebapp" command, and then type the following commands.
>mvn compile


 Simply executing the command mvn package creates our WAR file
>mvn package


To run this application we simply add the jetty plug-in to pom.xml for this web application. This following code will be added to the pom.xml

<build>
    <finalName>yschool-mini-mayoowebapp</finalName>
          <plugins>
          <plugin>
          <groupId>org.mortbay.jetty</groupId>
          <artifactId>maven-jetty-plugin</artifactId>
          <version>6.1.10</version>
          <!--<configuration>-->
          <!--<scanIntervalSeconds>10</scanIntervalSeconds>-->
          <!--<stopKey>stop</stopKey>-->
          <!--<stopPort>9999</stopPort>-->
          <!--</configuration>-->
          <executions>
          <execution>
                   <id>start-jetty</id>
                   <phase>deploy</phase>
                   <goals>
                   <goal>run</goal>
                   </goals>
                   <configuration>
                   <scanIntervalSeconds>0</scanIntervalSeconds>
                   <daemon>true</daemon>
                   </configuration>
          </execution>
          </executions>
          </plugin>
          </plugins>
  </build>


We can now run our web application by simply typing the command as shown below.
>mvn install jetty:run


We can now open our web browser to localhost:8080/ yschool-mini-mayoowebapp to see our web application.


Monday, April 23, 2012

First Maven Project

Configuration steps for create simple maven project


Download and install  jdk-7u3-windows-i586  and setup the class path

http://www.oracle.com/technetwork/java/javase/downloads/jdk-7u3-download-1501626.html


Download and install apache-maven-3.0.4 and setup the path


Open command line and type "mvn --version" to verify the successful installation


If installation is correct the following message will be shown

Apache Maven 3.0.4 (r1232337; 2012-01-17 00:44:56-0800)
Maven home: C:\Program Files\Apache Software Foundation\apache-maven-3.0.4
Java version: 1.7.0_03, vendor: Oracle Corporation
Java home: C:\Program Files\Java\jdk1.7.0_03\jre
Default locale: en_US, platform encoding: Cp1252
OS name: "windows 7", version: "6.1", arch: "x86", family: "windows"


Setup proxy sever to create a maven project

Open "C:\Program Files\Apache Software Foundation\apache-maven-3.0.4\conf " folder 

Edit the settings.xml file using the following code with appropriate proxy details

<proxies>    
    <proxy>
      <id>optional</id>
      <active>true</active>
      <protocol>http</protocol>
      <username>proxy_netuser</username>
      <password> proxy_netuser </password>
      <host>proxy.host.net</host>
      <port>80</port>
     <nonProxyHosts>local.net|some.host.com</nonProxyHosts>
    </proxy>   
  </proxies>


git hub proxy setup


 git config --global http.proxy http://proxyuser:proxypwd@proxy.server.com:8080


Java web


I had an opportunity to enter java web programming through the Yarlithub. That is first entrance to java web. But, I didn't get a chance like this before it. So, i would like to thank to Yarlithub. Before that i heard about java web technologies through software industries visit to Colombo, but it was not clear me.

One day I had a chance to participate to opening ceremony of the Yarlithub at the IIS City Campus. There I heard about the yShool open source project.

The ySchool project is a simple open source School Management System, especially for Sri Lankan Schools that are located in rural areas.

So, I wish to join to the develping team of ySchool project.